Pages

Showing posts with label Ligthning. Show all posts

Friday, June 5, 2020

Let's Communicate !!! Lightning Message Service | Message Channel | Salesforce

Salesforce introduced a new feature Lightning Message Service (LMS) in Winter 20 and is generally available in Summer 20. This feature allows developers to easily communicate between VF and Lightning. This feature provides a quick channel to which consumers can consume and get both updates and convenient tags/modules, so developers don't have to worry about CometD resources and/or complicated Javascript.

In this blog, I will share with you how to create an LMS channel and then write code in LWC and VF both to send messages.

Use Case: I want to display selected account record details on the VF Page, I will select the account record on the LWC component and for that account, all information will be displayed on VF Page.

Before we start writing our code, we have to create a Message Channel. As of right now, the only way to leverage this is by using Metadata API.

How we can create Message Channel?

Message Channel can be created using VS Code. You need to follow the below steps to create Message Channel.

  1. Create a folder under force-app/menu/default folder and the folder name will be "messageChannels"
  2. Once you have created the folder, under that folder you need to create a file with naming convention as "SampleMessageChannel.messageChannel-meta.xml".
  3. Once you have created the file we need to add some XML code into that file and will look something like below

<?xml version="1.0" encoding="UTF-8"?>
<LightningMessageChannel xmlns="http://soap.sforce.com/2006/04/metadata">
   <masterLabel>PassRecordId</masterLabel>
   <isExposed>true</isExposed>
   <description>This Lightning Message Channel sends information from LWC to VF.</description>
   <lightningMessageFields>
       <fieldName>recordIdToSend</fieldName>
       <description>Record Id to be send</description>
   </lightningMessageFields>
   <lightningMessageFields>
       <fieldName>objectName</fieldName>
       <description>Identifies for which object we are sending the record id</description>
   </lightningMessageFields>
</LightningMessageChannel>

Where the "lightningMessageFields" tag is used to create a parameter that we need to send via LMS. We can create as many fields as we want per requirement. In my case, I have created "recordIdToSend" as a parameter which will hold Account record Id and "objectName" will hold the object name as 'Account'.
 
    4. Now, we need to add the entry for LMS in package.xml

<types>
        <members>*</members>
        <name>LightningMessageChannel</name>
    </types>


Let's create the LWC component and VF Page to publish and subscribe to the LMS.

VF Page code

To subscribe to the LMS on the VF page we use sforce.one API.
If you see in the below code I have subscribed the channel using sforce.one.subscribe method.

<!--
  @File Name          : LMS_AccountDetails.page
  @Description        : 
  @Author             : @tandonprateek
  @Group              : 
  @Last Modified By   : @tandonprateek
  @Last Modified On   : 6/6/2020, 7:52:36 AM
  @Modification Log   : 
  Ver       Date            Author      		    Modification
  1.0    6/6/2020   @tandonprateek     Initial Version
-->

<apex:page controller="LMS_AccountDetailsController">
    <script>
        var PASSRECORDID = "{!JSENCODE($MessageChannel.PassRecordId__c)}";
        var subscriptionToMC;
        if (!subscriptionToMC) {
            subscriptionToMC = sforce.one.subscribe(PASSRECORDID, onPublished, {scope: "APPLICATION"});
} function onPublished(message) { console.log('recordId on VF page ==== ' + message.recordIdToSend); getAccountData(message.recordIdToSend); } </script> <apex:form> <apex:actionFunction name="getAccountData" action="{!fetchAccountDetailRecord}" reRender="accountDetailsBlock"> <apex:param name="recordId" value=""></apex:param> </apex:actionFunction> <apex:pageBlock id="accountDetailsBlock" title="VF Page Display Account Details"> <apex:pageBlockSection id="accountSection"> <apex:outputField value="{!accDetailObject.Name}"></apex:outputField> <apex:outputField value="{!accDetailObject.Phone}"></apex:outputField> </apex:pageBlockSection> </apex:pageBlock> </apex:form> </apex:page>

Apex Class

/**
 * @File Name          : LMS_AccountDetailsController.cls
 * @Description        : 
 * @Author             : @tandonprateek
 * @Group              : 
 * @Last Modified By   : @tandonprateek
 * @Last Modified On   : 6/6/2020, 7:53:48 AM
 * @Modification Log   : 
 * Ver       Date            Author      		    Modification
 * 1.0    6/6/2020   @tandonprateek     Initial Version
**/

public with sharing class LMS_AccountDetailsController {

    public Account accDetailObject {get;set;}

    
    /**
    * @description 
    * @author @tandonprateek | 6/6/2020 
    * @return Pagereference 
    **/
    public Pagereference fetchAccountDetailRecord(){
        String accId = Apexpages.currentPage().getParameters().get('recordId');
        accDetailObject = [Select Id, Name, Phone from Account where Id =: accId];
        return null;
    }
}


LWC Component code

<!--
   @File Name          : accountInfoComponent.html
   @Description        : 
   @Author             : @tandonprateek
   @Group              : 
   @Last Modified By   : @tandonprateek
   @Last Modified On   : 6/6/2020, 7:51:35 AM
   @Modification Log   : 
   Ver       Date            Author      		    Modification
   1.0    6/6/2020   @tandonprateek     Initial Version
   -->
<template>
   <div class="slds-page-header">
      <div class="slds-grid">
         <div class="slds-col slds-has-flexi-truncate">
            <p class="slds-text-title_caps slds-line-height_reset">LWC Component Account Info</p>
            <h1 class="slds-page-header__title slds-m-right_small slds-align-middle slds-truncate"  title="AccountInfo">Acount Info</h1>
         </div>
      </div>
   </div>
   <lightning-button label="Get All Accounts" onclick={handleClick}></lightning-button>
   <lightning-card title="Account Result Data" icon-name="custom:custom3">
      <div class="slds-m-around_medium">
         <ul>
            <template for:each={finalData} for:item="acc">
               <li key={acc.Id} >
                  <a hrefv="javascript:void(0);" data-record-id={acc.Id} onclick={handleClickonAccountName}>{acc.Name}</a>
               </li>
            </template>
         </ul>
      </div>
   </lightning-card>
</template>


To use LMS in LWC we need to first import the methods from lightning/MessageChannel library and import the message channel, in my case, I need to add the below code to my LWC js file.

import { publish,createMessageContext,releaseMessageContext, subscribe, unsubscribe } from 'lightning/messageService';
import PassRecordId from "@salesforce/messageChannel/PassRecordId__c";

Below is my LWC js file

/**
 * @File Name          : accountInfoComponent.js
 * @Description        : 
 * @Author             : @tandonprateek
 * @Group              : 
 * @Last Modified By   : @tandonprateek
 * @Last Modified On   : 6/6/2020, 7:51:50 AM
 * @Modification Log   : 
 * Ver       Date            Author             Modification
 * 1.0    6/6/2020   @tandonprateek     Initial Version
**/
import { LightningElement, track } from "lwc";
import { searchAccountByName, searchAccountById, searchAccountsByIds, fetchAccounts, fetchAllAccounts } from "c/accountService";
import { publish,createMessageContext,releaseMessageContext, subscribe, unsubscribe } from 'lightning/messageService';
import PassRecordId from "@salesforce/messageChannel/PassRecordId__c";

export default class AccountInfoComponent extends LightningElement {
    searchKey = '';
    searchKeyText = '';
    data = [];
    context = createMessageContext();

    handleClick() {
        fetchAllAccounts()
            .then(result => {
                this.data = result;
                console.log(result);
            })
            .catch(error => {
                console.log(error.message);
            });
    }

    get finalData(){
        return this.data;
    }

    handleClickonAccountName(event){
        //let recordId = event.currentTarget.getAttribute('key');
        //let recordId = event.target.value;
        let recordId = event.target.dataset.recordId;
        console.log('recordId ==== ' + recordId);
        const payload = {
            recordIdToSend: recordId,
            objectName: 'Account'
        };

        publish(this.context, PassRecordId, payload);
    }

}

Here I have used Service Components to get the account records, you can refer to my previous blog about Service Component in LWC.
Now, to publish the LMS I need to call the publish method to call the LMS channel and pass the payload to the channel.

Below is the demo:


In summary, LMS provides us a very easy and quick way to move complex data across the DOM between LWC and VF Page, allowing for better interoperability.

References:

https://releasenotes.docs.salesforce.com/en-us/winter20/release-notes/rn_lc_message_channel.htm

https://newstechnologystuff.com/2020/03/22/lightning-message-service-quick-demo/
Sunday, May 24, 2020

Lightning Web Component : What are Service Components & How are they Useful?

As we keep working on complex LWC applications, it’s inevitable that complexity will increase. With increased complexity in code, we will need to write a modular reusable code. In this blog, I will try to explain how we can create a reusable LWC code using Service Components.

Let's try to define What is Service Components?

A service component is a component that provides a set of functionalities in a single component. Ideally, the service should be specialized, generic, and reusable. Also, this component does not have a markup, i.e. this is not visible by default.
This helps in reducing code duplication and simplifies the component's code. This, in turn, makes the code more robust and easier to maintain.

How we can Create a Service Component?

I have taken an Account object for my example and I will be creating a service component for my Account object.

AccountService.cls as Apex Class:

public with sharing class AccountService {
    
    public AccountService() {

    }

    @AuraEnabled
    public static List<Account> searchAccountByName(String accountName) {
        List<Account> accounts = [SELECT Id, Name FROM Account WHERE Name=:accountName];
        if (accounts.size() > 0) {
            return accounts;
        }
        return null;
    }

    @AuraEnabled
    public static List<Account> fetchAccountById(String accountId) {
        List<Account> accounts = [SELECT Id, Name FROM Account WHERE Id=:accountId];
        if (accounts.size() > 0) {
            return accounts;
        }
        return null;
    }

    @AuraEnabled
    public static List<Account> fetchAccountsByIds(List<Id> accountIds) {
        List<Account> accounts = [SELECT Id, Name FROM Account WHERE Id in: accountIds];
        if (accounts.size() > 0) {
            return accounts;
        }
        return null;
    }

    @AuraEnabled
    public static List<Account> searchAccounts(String accountName) {
        String query = 'Select Id, Name from Account where Name like ' + '\'%' + accountName + '%\'';
        List<Account> accounts = Database.query(query);
        if (accounts.size() > 0) {
            return accounts;
        }
        return null;
    }

    @AuraEnabled
    public static List<Account> fetchAllAccounts(List<Id> accountIds) {
        List<Account> accounts = [SELECT Id, Name FROM Account LIMIT 10];
        if (accounts.size() > 0) {
            return accounts;
        }
        return null;
    }
}


accountService as Service Component:

import getAccountByName from "@salesforce/apex/AccountService.searchAccountByName";
import getAccountById from "@salesforce/apex/AccountService.fetchAccountById";
import getAccountsByIds from "@salesforce/apex/AccountService.fetchAccountsByIds";
import getAccounts from "@salesforce/apex/AccountService.searchAccounts";
import getAllAccounts from "@salesforce/apex/AccountService.fetchAllAccounts";

const searchAccountByName = async accountName => {
   const response = await getAccountByName({ accountName: accountName });
   return response;
};

const searchAccountById = async accountId => {
    const response = await getAccountById({ accountId: accountId });
    return response;
};

const searchAccountsByIds = async accountIds => {
    const response = await getAccountsByIds({ accountIds: accountIds });
    return response;
};

const fetchAccounts = async accountName => {
    const response = await getAccounts({ accountName: accountName });
    return response;
 };

const fetchAllAccounts = () => {
   return new Promise(resolve => {
    getAllAccounts()
         .then(data => {
            resolve(data);
         })
         .catch(error => {
            resolve(error);
         });
   });
};

export { searchAccountByName, searchAccountById, searchAccountsByIds, fetchAccounts, fetchAllAccounts };

In the above component, I have exposed the below services

  • searchAccountByName: it accepts the search key as accountName and will return the account record with the exact account name
  • searchAccountById: it accepts the search key as accountId and will return the account with the exact account id
  • searchAccountsByIds: it accepts the set of account ids and will return the list of account
  • fetchAccounts: it accepts the search key as accountName and will return the list of Account records which contains name as search keyword.
  • fetchAllAccounts: this returns the list of accounts.
You will also notice that I have followed the Singleton pattern to develop this component i.e. this component has only one instance.
Now to use the above services, I have created one component which will consume these services.

accountInfo as LWC Component:

accountInfoComponent.html

<template>
        <lightning-button label="Get All Accounts" onclick={handleClick}></lightning-button>
      
        <lightning-layout vertical-align="end" class="slds-m-bottom_small">
            <lightning-layout-item flexibility="grow">
                <lightning-input type="search" onchange={handleKeyChange} label="Search By Exact Name" value={searchKey} ></lightning-input>
            </lightning-layout-item>
            <lightning-layout-item class="slds-p-left_xx-small">
                <lightning-button label="Search By Exact Name" onclick={handleSearchAccountByName}></lightning-button>
            </lightning-layout-item>
        </lightning-layout>

        <lightning-layout vertical-align="end" class="slds-m-bottom_small">
            <lightning-layout-item flexibility="grow">
                <lightning-input type="search" onchange ={handleKeyTextChange} label="Filter By Name" value={searchKeyText} ></lightning-input>
            </lightning-layout-item>
            <lightning-layout-item class="slds-p-left_xx-small">
                <lightning-button label="Filter By Name" onclick={handleSearchAccountsByName}></lightning-button>
            </lightning-layout-item>
        </lightning-layout>

        
            <lightning-card title="Account Result Data" icon-name="custom:custom3">
                <div class="slds-m-around_medium">
                        <ul>
                            <template for:each={finalData} for:item="acc">
                                <li key={acc.Id}>{acc.Name}
                                    
                                </li>
                            </template>
                        </ul>
                </div>
            </lightning-card>

        
      </template>

accountInfoComponent.js

import { LightningElement, track } from "lwc";
import { searchAccountByName, searchAccountById, searchAccountsByIds, fetchAccounts, fetchAllAccounts } from "c/accountService";


export default class AccountInfoComponent extends LightningElement {
    searchKey = '';
    searchKeyText = '';
    data = [];


    handleKeyChange(event) {
        this.searchKey = event.target.value;
    }

    //get all the accounts
    handleClick() {
        fetchAllAccounts()
            .then(result => {
                this.data = result;
                console.log(result);
            })
            .catch(error => {
                console.log(error.message);
            });
    }

    //get Account by Name
    handleSearchAccountByName() {
        this.fetchAccountByName(this.searchKey);
    }

    async fetchAccountByName(accountName) {
        try {
            let account = await searchAccountByName(accountName);
            this.data = account;
        } catch (err) {
            console.log(err);
        }
    }

    //get Account by Id
    handleSearchAccountById() {
        this.fetchAccountById(this.accountId);
    }

    async fetchAccountById(accountId) {
        try {
            let account = await searchAccountById(accountId);
            this.data = account;
        } catch (err) {
            console.log(err);
        }
    }

    //get Accounts by Ids
    handleSearchAccountsByIds() {
        this.fetchAccountsByIds(this.accountIds);
    }

    async fetchAccountsByIds(accountIds) {
        try {
            let accounts = await searchAccountsByIds(accountIds);
            this.data = accounts;
        } catch (err) {
            console.log(err);
        }
    }

    handleKeyTextChange(event){
        this.searchKeyText = event.target.value;
    }

    //get accounts by name with a search text on name
    handleSearchAccountsByName() {
        this.fetchAccountsByName(this.searchKeyText);
    }

    async fetchAccountsByName(accountName) {
        try {
            let accounts = await fetchAccounts(accountName);
            this.data = accounts;
        } catch (err) {
            console.log(err);
        }
    }

    get finalData(){
        console.log('wwww ' + JSON.stringify(this.data))    ;
        return this.data;
    }

}

accountInfoComponent.js-met.xml:

<?xml version="1.0" encoding="UTF-8"?>
<LightningComponentBundle xmlns="http://soap.sforce.com/2006/04/metadata">
    <apiVersion>48.0</apiVersion>
    <isExposed>true</isExposed>
    <targets>
        <target>lightning__AppPage</target>
    </targets>
</LightningComponentBundle>


Monday, May 18, 2020

Part I : Understanding Change Data Capture using Asynchronous Apex Triggers and Handling Platform Event in Lightning Web Components

Salesforce introduced Change Data Capture and Asynchronous Apex Triggers in Summer 19 release. Change Data Capture publishes change events, which represents changes to Salesforce records. Changes include the creation of a new record, updates to an existing record, deletion of a record, and undeletion of a record.

Available in: both Salesforce Classic and Lightning Experience
Available in: Enterprise, Performance, Unlimited, and Developer editions


Use of Change Data Capture events to:
  • Receive notifications of Salesforce record changes, including create, update, delete, and undelete operations.
  • Capture field changes for all records.
  • Get broad access to all data regardless of sharing rules.
  • Get information about the change in the event header, such as the origin of the change, which allows ignoring changes that your client generates.
  • Perform data updates using transaction boundaries.
  • Use a versioned event schema.
  • Subscribe to mass changes in a scalable way.
  • Get access to retained events for up to three days
Supported Objects

Change events are available for all custom objects defined in your Salesforce org and a subset of standard objects. To see the complete list of supported standard objects, please click here.


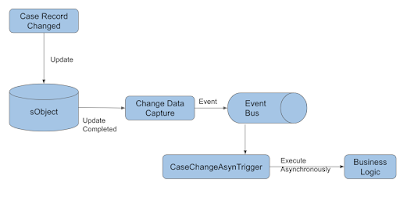
Understanding the Flow for Change Data Capture

So when a record is created or updated, Change Data Capture publishes an event and a change event trigger can then process that event asynchronously. Above is a simple example to understand the flow better. Once any record completes its execution then change data publish an event and then Asynchronous Apex Trigger starts processing.


Setup Change Data Capture

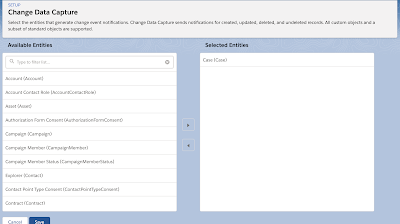
First, we need to enable Change Data Capture for the object. In Setup Search for Change data Capture and open it.


Once we have enabled it, we need to subscribe to the change events. To subscribe to the change events we will be using Subscribe with Apex Triggers. But before diving to apex triggers we need to understand the naming conventions for the channels which will be subscribing to the change.


Subscription Channels

Use the subscription channel that corresponds to the change notifications you want to receive. The channel name is case-sensitive.

All Change Events
/data/ChangeEvents

A Standard Object
/data/(Standar Object Name)ChangeEvent

For example, the channel to subscribe to change events for Case records is:
/data/CaseChangeEvent

A Custom Object
/data/(Custom Object Name)__ChangeEvent

For example, the channel to subscribe to change events for Candidate__c custom object records is:
/data/Candidate__ChangeEvent

If you want to learn more about Change Data Capture, please click here.


Subscription Using Apex Triggers

The change event trigger fires when one or a batch of change events is received. The change event trigger is not like object triggers, it runs asynchronously after the database transaction is completed. The asynchronous execution makes change event triggers ideal for processing resource-intensive business logic while keeping transaction-based logic in the object trigger. Change event triggers can help reduce transaction processing time.

Below is the example:


trigger CaseChangeEventTrigger on CaseChangeEvent (after insert) {

    List<CaseChangeEvent> changes = Trigger.new;
    
    Set<String> caseIds = new Set<String>();
    
    for (CaseChangeEvent change : changes) {
        // Get all Record Ids for this change and add to the set
        List<String> recordIds = change.ChangeEventHeader.getRecordIds();
        caseIds.addAll(recordIds);
    }
    
    // Publish platform events for predicted red accounts
    List<DemoLight12__Case_Change_Event__e> caseChangeEvents = new List<DemoLight12__Case_Change_Event__e>();
    for (Case caseObj : [Select Id,CaseNumber from Case where Id in: caseIds]) {
        caseChangeEvents.add(new DemoLight12__Case_Change_Event__e(DemoLight12__CaseNumber__c=caseObj.CaseNumber));
    }
    
    System.debug('RED_ACCT: ' + caseChangeEvents);
    if (caseChangeEvents.size() > 0) {
        EventBus.publish(caseChangeEvents);
    }
}

In the above code, I have created a platform event as Case_Change_Event__e, and by using EventBus.publish method I have published an event message.

If you want to learn more about Platform Events, please click here.


Handling Platform Events in Lightning Components

The lightning/empApi module provides access to methods for subscribing to a streaming channel and listening to event messages. All streaming channels are supported, including channels for platform events, PushTopic events, generic events, and Change Data Capture events.

Note:
  • This component is available in the 44.0 API version or later.
  • This is available in Lightning Experience and only supported in desktop browsers.
Use case: I want to display a message on the Case Detail record page that particular case has been updated by others and the logged-in person is working on different cases, so on the case detail page logged in person will get a message displayed at the top which case has been updated. Below are the components I have used to achieve my use case:

  • Setup Change Data Capture on Case object explained above.
  • Create a Platform Event as Case_Change_Event__e and one custom field as Casenumber__c within the platform event object to store the CaseNumber which got updated.
  • Create an Async Apex trigger as CaseChangeEventTrigger (explained above) to publish the platform event.
  • Custom LWC component as caseChangeEvent which will subscribe to the platform event and will update the message on UI.


Below is the code for the LWC component which will be added on the Case Detail record page and will subscribe to the platform event and display the message of any records got updated.


caseChangeEvent.html


<template>
    <lightning-card title="Pinned Updates on Cases" icon-name="custom:custom14">
        <div class="slds-m-around_medium">
            {finalMessage}
        </div>
        
    </lightning-card>
</template>


caseChangeEvent.js


import { LightningElement, api } from 'lwc';
import { subscribe, unsubscribe, onError, setDebugFlag, isEmpEnabled } from 'lightning/empApi';

export default class EmpApiLWC extends LightningElement {
    channelName = '/event/DemoLight12__Case_Change_Event__e';
    isSubscribeDisabled = false;
    isUnsubscribeDisabled = !this.isSubscribeDisabled;

    message;

    renderedCallback() {
        const messageCallback = (response) => {
            console.log('New message received : ', JSON.stringify(response));
            // Response contains the payload of the new message received
            console.log('New message received : ', response.data.payload.DemoLight12__CaseNumber__c);
            this.message = 'Case ' + response.data.payload.DemoLight12__CaseNumber__c + ' has been updated';
        };

        // Invoke subscribe method of empApi. Pass reference to messageCallback
        subscribe(this.channelName, -1, messageCallback).then(response => {
            // Response contains the subscription information on successful subscribe call
            console.log('response === ' + JSON.stringify(response));
            console.log('Successfully subscribed to : ', JSON.stringify(response.channel));
        })
    }

    registerErrorListener() {
        // Invoke onError empApi method
        onError(error => {
            console.log('Received error from server: ', JSON.stringify(error));
            // Error contains the server-side error
        });
    }

    get finalMessage(){
        return this.message;
    }
}

If you observe in the above code I have imported lightning/empApi which provides below method

  • subscribe - Subscribes to a given channel
  • unsubscribe - Unsubscribes from the channel using the given subscription object
  • onError - Registers a listener to errors that the server returns.
  • setDebugFlag - Set to true or false to turn console logging on or off respectively.
  • isEmpEnabled - Returns a promise that holds a Boolean value. The value is true if the EmpJs Streaming API library can be used in this context; otherwise false.
To learn more about lightning/empApi, please click here.

caseChangeEvent.js-meta.xml


<?xml version="1.0" encoding="UTF-8"?>
<LightningComponentBundle xmlns="http://soap.sforce.com/2006/04/metadata">
    <apiVersion>48.0</apiVersion>
    <isExposed>true</isExposed>
    <targets>
       <target>lightning__RecordPage</target>
   </targets>
</LightningComponentBundle>

Live Demo:


I hope this will help to understand platform events handling in lightning components. 

Looking forward to everyone's suggestions and comments!!!